Altenew | Stamp Focus Part 1 | Layout


Altenew Stamp Focus | Was ist das?!

Auf einen einfachen Nenner gebracht, bedeutet Stamp Focus, dass jeweils ein Stempelset aus dem Sortiment von Altenew im Rampenlicht steht und drei Ideen für den kreativen Einsatz dieses Stempelsets gezeigt werden. Für den Monat August wählte ich das Stempelset Framed für meinen Stamp Focus-Post auf dem Scrapbook Blog von Altenew. Das Set hat mir auf Anhieb gefallen, da mir sofort mehrere Möglichkeiten im Kopf herumschwirrten, die Rahmen kreativ zu 'verstempeln'. Zudem finde ich es eine gelungene Abwechslung zu den häufig vorkommenden Motiven mit wunderschönen Blumen oder Schriftzügen.


Altenew | Stamp Focus?!

I'm sharing three new creative projects over on the Altenew Scrapbook Blog today. It's all about Stamp Focus and the Stamp Set Framed. Please hop on over there too to find out more. You're welcome to use the translation tool to translate the following text from German to English. However, you will find most of the details on the Altenew Scrapbook Blog too. Thanks for stopping by today. Have a wonderful day, yours Sandra.


Gestaltungsideen auf einen Blick

  • Rahmen für ein Foto | Layout 2017 (heutiger Post)
  • Kompletter Hintergrund eines Layouts | Layout Flowers (im nächsten Post)
  • Dekoration des Covers | Paper Book / Mini Journal Currently (im nächsten Post)


Layout 2017 | Rahmen für ein Foto

Auf meinem Blog starte ich heute mit dem Layout 2017. Die weiteren Projekte zeige ich im nächsten Post hier auf meinem Blog. Schauen wir uns zunächst das komplette Layout an, bevor ich weiter unten auf die Details eingehe. 


Details des Layouts

Schauen wir uns nun die Details des Layouts genauer an. Welche Materialien und Techniken verwendete ich zur Gestaltung?

  • Hintergrund Der Hintergrund ist ein einfaches weißes, etwas festeres Blatt aus einem A3 Schulzeichenblock. Das Hintergrundpapier hat die Größe 8.5 x 11.

  • Kolorierter Fotorahmen Die nächstliegende Möglichkeit, die Stempel eines Rahmensets auf einem Scrapbook Layout zu verwenden, ist die Verwendung als Rahmen für Fotos. Die Rahmen könnt ihr schwarz oder farbig stempeln und dann so belassen oder z.B. mit Wassermalfarben verschönern.

  • Stempel 2017 | Gestempelte und kolorierte Jahresangabe Auch bei der Jahreszahlangabe kamen Wassermalfarben und ein Pinsel zum Einsatz. Ich finde diesen Stempel genial. Die Kombination aus Zahlen und Schrift ist einfach mega und gut gelungen.


  • Ausgestanzte Motive Neben Kreisen in verschiedenen Größen seht ihr auch einige Rosenblüten mit Blättern. Kreise und Rosen sind mit Stanzmaschine und gemustertem Papier entstanden. Einige der Motive sind mit 3-D-Klebepads auf dem Hintergrund befestigt, andere mit dem Tacker.

  • Stempeln Neben dem gestempelten Rahmen, findet ihr auch verschiedene Schriftzüge sowie den bereits erwähnten Jahresstempel 2017. Die Motive sind mit schwarzer Stempelfarbe gestempelt.


  • Klecksen Kleine schwarze und orangefarbene Farbspritzer wurden mit Farbsprays aufgetragen. Dazu wird das Farbspray geöffnet und die Kanüle mit Schwung in Richtung Papier bewegt, so dass die Farbe aus der Kanüle auf das Papier gespritzt wird. TIPP: Fotos zum Schutz vor Farbspritzern mit Papier o.ä. abdecken.

  • Dekorieren Enamel Dots, dezente Bleistiftlinien sowie ein handgeschriebenes Journaling runden das Layout ab.


Ich hoffe, euch gefällt mein erstes Stamp Focus Projekt. Die beiden anderen Projekte zeige ich im nächsten Post. Danke für's Vorbeischauen. Habt einen tollen Tag, eure Sandra.


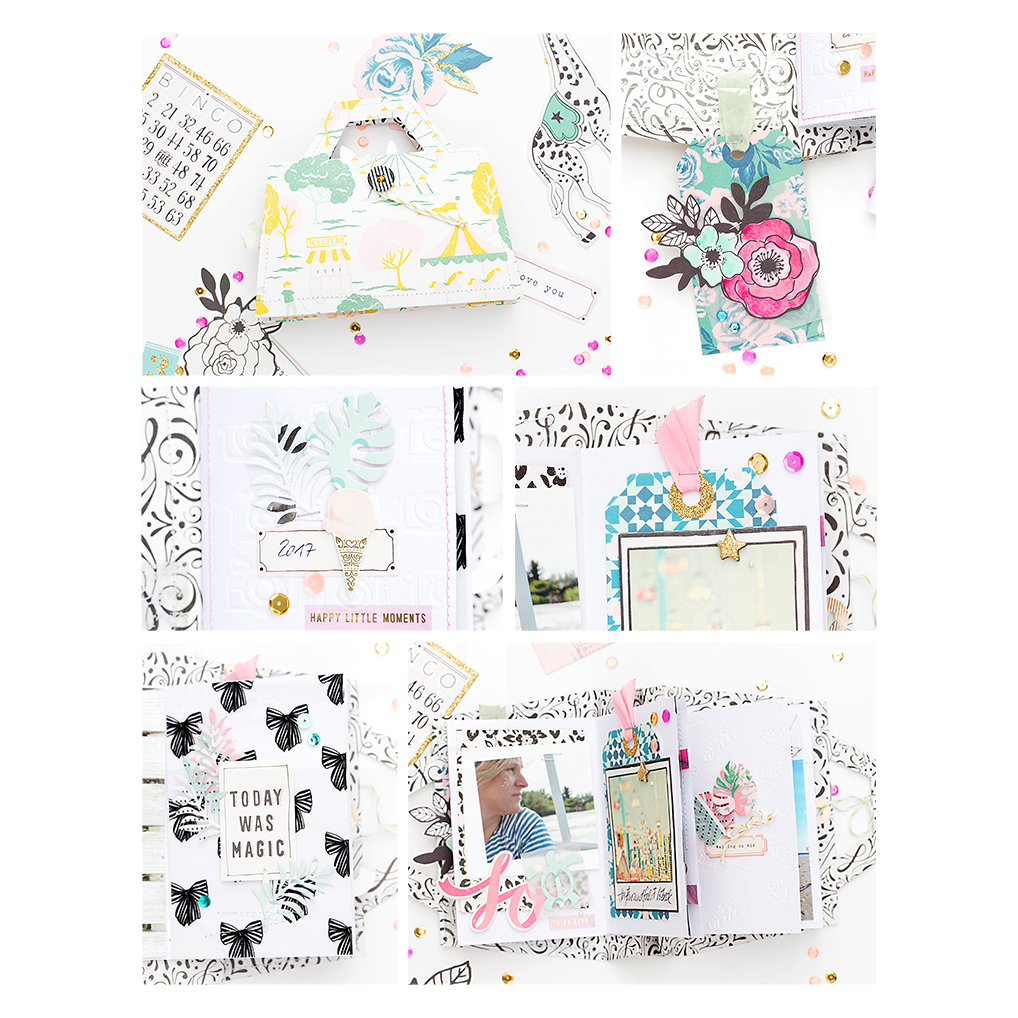
Crate Paper | Handtasche mit Minialbum | Mini Album In A Handbag


Handtasche mit Minialbum

Ich möchte euch gern auf eine kleine Reise durch eine meiner neuesten Minialbumkreationen einladen. Das Mini entstand bereits Mitte Juli, zur gleichen Zeit wie die hübsche Handtasche mit vier Karten (klick) - vielleicht erinnert ihr euch noch daran?! Das Besondere an dem Mini ist die Hülle in Form einer Handtasche. In einer selbst genähten Handtasche aus Papier finden zwei kleine Minialben sowie ein Anhänger einen Platz. Auf der Rückseite des Anhängers sind schöne Dinge aus unserem Urlaub zur Erinnerung in Wortform festgehalten. Das Minialbum entstand für Crate Paper mit der Carousel Collection. Auch auf dem Blog von Crate Paper zeige ich euch eine kleine Auswahl von Fotos. Schaut gern auch dort vorbei. Am Ende dieses Blogposts sowie auf meinem Youtube-Kanal findet ihr ein kleines 'Walk-Through Video'. Liebe Grüße von eurer Sandra.


Mini Album In A Handbag

Come on and join me on a little photo journey today. I'm sharing photos of my latest mini album creation, which I made in mid July 2017. It's special, because the two mini albums I created come in a sewn handbag. I made this album for Crate Paper with the Carousel Collection. You can find a selection of photos over on the Crate Paper blog too. I also included a short walk-through video at the end of this post and on my youtube channel. Please use the translation tool to translate the subsequent text. Thanks for stopping by. Have a great day. Yours Sandra.


Mini album in a handbag @mojosanti for @cratepaper


Make your mini albums special. Present and store them in handmade paper handbags, in decorated cardboard boxes, wooden boxes or in muslin or paper bags. This is not only a fancy way to store your mini albums, it will also prevent them from getting dusty :).

vacation memories in a handbag @mojosanti for @cratepaper


Ein Blick in die Handtasche

In der Handtasche befinden sich zwei Minialben und ein Anhänger. Letzterer enthält auf der Rückseite notierte Highlights unseres Urlaubs. Zur Gestaltung der Minialben nutzte ich verschiedene Techniken, die ich auch schon bei früheren Minialben verwendete, z.B.:


Details & Techniken des Handtaschenminis

  • Prägen mit Prägefolder
  • Nähen mit der Nähmaschine
  • Journaling auf Transparentpapier
  • Kolorieren mit Wassermalfarbe
  • Stanzen mit Stanzmaschine
  • Anbringen von Einschubtaschen mit doppelseitigem Klebeband sowie
  • Kombinieren verschiedener Materialien: gemustertes und weißes Papier, Stoffbänder, Pailletten, Chipboard Sticker, Aufkleber, Garn, bedruckte Transparentfolie, Transparentpapier

Und nun wünsche ich euch viel Spaß und Freude mit vielen Fotos und kleinen Einblicken in meine Handtasche :).


Hey ... da hat sich doch etwas Glitter auf meine Wange 'geschmuggelt' - von dem Stern auf der gegenüberliegenden Seite. Tsss ... life is better with glitter and bling-bling :).


Altenew | August 2017 Release Blog Hop Day 2 + Giveaway


Welcome

Welcome to our August 2017 Release Blog Hop Day 2. You might have come here from Hussena. And now it's my turn to inspire you with my scrapbook layout 'Life is beautiful'.


Scrapbook Layout ‘Life is beautiful’

For today’s scrapbook layout inspiration, I combined products from the August 2017 release with bits and pieces from the Reflection Scrapbook Collection. I really went out of my (minimal) comfort zone with this layout. Because the layout is much wilder, more colorful and vibrant and a bit more 'crowded' than many of my previous scrapbook layouts have been. But you know what, I'm soooo excited about this layout. It makes me happy :). And not just because the photo and the background paper are a perfect match. I just like how everything comes together nicely on this layout.


Layout Details

Let’s have a look at some of the details of the 8.5 x 11 scrapbook layout that I created for today’s release blog hop. Here we go. I'm going to point out the details of the layout and also the supplies I've used.


Rose Filament Die Set


New | Storage Pouches

I would also like to draw your attention to the New Storage Pouches from Altenew. I’ve got a pack of 25 each of the medium and large size pouches. And they are just perfect for storing your stamp sets and die sets, but also other papercrafting items from Altenew.


Prizes

To celebrate this release, Altenew is giving away a $50 gift certificate to THREE lucky winners! Please leave a comment on the Altenew Scrapbook Blog by Thursday, August 31st at 11:59pm EDT for a chance to win. The winners will be announced on the Altenew Scrapbook Blog on Saturday, September 2nd.

Blog Hop Order

Altenew Scrapbook Blog
Debby Hughes
Hussena Calcuttawala
Sandra Dietrich ---YOU ARE HERE---
Taheerah Atchia
Sveta Fotinia
Olga Moss
Irit Landgraf
Lydia Evans
Missy Whidden
Dana Gong
Enza Gudor
Laura Jane
Agnieszka Malyszek
Kimberly Crawford
Erum Tasneem


Last but not least

Thank you for stopping by here on my blog today. Your next stop on the blog hop is over at Taheerah. Have a great day and I’m hoping that you’re enjoying our hop. Xoxo, Sandra


Crate Paper | Fun With Embellies | Scrapbook Layout


Crate Paper | Fun With Embellies

Auf dem Blog von Crate Paper zeige ich euch ein neues, farbenfrohes Scrapbook-Layout zum Thema Fun with Embellies mit der Carousel Collection von Crate Paper. Die handgenähten Wolken sind mein persönliches Highlight dieses Layouts. Schaut gern auch auf dem CP Blog vorbei, um mehr zu erfahren. Habt einen schönen Tag. Liebe Grüße von eurer Sandra.


Tipps für genähte Motive auf Layouts

  • Motive können mit Schablonen oder - wenn vorhanden - mit einem Schneideplotter in das Papier gestochen werden.
  • Alternativ könnt ihr die Motive mit einem Bleistift vorzeichnen und entlang der Linien kleine Löcher mit der Nadel einstechen (wie beim Prickeln).
  • Bei Motiven mit Rundungen empfehle ich die Abstände zwischen den Löchern kleiner zu machen. So werden sie schön rund und weniger eckig.
  • Mit einem guten Radiergummi entfernt ihr die Bleistiftlinien.
  • Anschließend näht ihr dann mit Nadel und einem Garn eurer Wahl die Motive nach.
  • Die Fadenenden befestige ich mit Washi-Tape auf der Rückseite des Layouts.


Scrapbook Layout

Let's have some fun with embellies and some hand-stitched clouds on the Crate Paper blog. Hop on over to find out more about a new scrapbook page I made with the beautiful Carousel Collection. Thank you for stopping by. Have a colorful day. Yours Sandra.


Why not add some stitched details to your scrapbook pages? Either machine-stitched or drawn with a pencil and then stitched by hand, they make your pages even more special. And I'm sure people will notice the extra effort you put into making your layout.


Spellbinders | Cards with Dies | Karten mit Stanzen


Spellbinders | Cards with dies 

Hi there, welcome to a new blog post showing some cards I made with new dies from Spellbinders. The Summer 2017 Catalog has some cute Halloween and Xmas dies in it, but also some dies that can be used for off-season projects. I like the cool house from the Haunted Manor Die (catalog number S2-265) and also the cute bat die from the Spooky Tree Die (catalog number S4-835). I also had the chance to test the Tumbling Blocks Quilt Die (catalog number S2-276). I used the latter for the first card I'm showing today. There is also a short 'how to' as an intro to the photos for each project. Thanks for stopping by today. Have a wonderful day, yours Sandra.


Karten mit Stanzen von Spellbinders

Anfang des Jahres wurde ich von Spellbinders gefragt, ob ich einige Blogbeiträge veröffentlichen möchte, die mit den Produkten dieser Firma entstehen. Da sagte ich nicht nein, denn es macht mir Spaß, neue Produkte auszuprobieren. Dies ist nun mein zweiter Post für Spellbinders. Den ersten Post findet ihr hier (klick). Drei neue Karten-Projekte sind entstanden. Thematisch geht es dabei um Halloween, Weihnachten und 'zeitlos'. Für die Karten verwendete ich Stanzen aus dem Sommer-Katalog von Spellbinders. Ich hoffe, es ist die eine oder andere Inspiration für euch dabei. Danke für's Vorbeischauen. Habt einen schönen Tag, eure Sandra.


How to: Card with Tumbling Blocks Quilt Die

You can use the die in at least two ways: 1) as a single element (where six diamond cut-out shapes are aligned in rows) or 2) you can use the six individual diamond shapes to make your own pattern. Here is what I did:

  • used Tumbling Blocks Quilt Die to die-cut the blocks as a single element from patterned paper
  • used patterned paper to cover the back of the aligned blocks
  • cut up some of the diamond shaped cut-outs into triangles
  • used a golden pen to add some shiny highlights
  • added some stamping (cute little hearts and title 'hello')
  • added a little bow made from baker's twine as a final touch ♥


How to: Card with Haunted Manor Die


  • die-cut the house, the bats and the title 'spooky' from patterned paper
  • use different patterned papers to back the windows, the door, the balcony and the stairs
  • 'go wild' and try something different with your background (just make everything look less 'straight' and more wild)


Mit der Platinum Maschine von Spellbinders können Projekte bis zu einer Größe von A4 hergestellt werden. 


How to: Card with Snowflakes Die


  • die-cut snowflakes with your cutting machine
  • use gold twine to string the snowflakes 
  • attach snowflakes (with glue dots) and the gold twine to the background paper (with washi-tape onto the backside of the background paper)
  • glue everything to a card base
  • add a stamped title
  • done ♥
  • combine black, white and gold for a festive elegant look